

※本記事は2021年7月2日に更新しました。
「長押しで表示するメニューってどうやって実装するの?」
今回はこちら疑問に答えていきます。
まずは次の動画をご覧ください。
リストの項目を長押しするとTranslationと書かれたメニューが表示され、
メニューの言語を押すと、テキストビューにその言語の言葉が現れます。
このように、長押しで表示されるメニューをコンテキストメニューと呼びます。
今回は、このコンテキストメニューの使い方を解説します。
前提として、本記事はAndroid Studio 4.2.1を対象に記載します。
また、筆者のAndroid Studioは日本語化しているため、日本語にて解説します。
本記事の使用言語はJavaとなります。
今回はProgate のJavaのレッスンがすべて理解できている、
という前提の上進めていきます。
では早速参りましょう!
前回の記事はこちら

コンテキストメニューの使い方

コンテキストメニューは以下の手順で実装します。
- コンテキストメニュー用のXMLファイルを作成
- 長押ししたときコンテキストメニューを表示するよう定義
- コンテキストメニューを実装するビューを指定
- コンテキストメニューを押したときの動作を定義
1つ1つ解説していきます。
コンテキストメニュー用のXMLファイルを作成
メニュー用XMLファイルを入れる用のmenuフォルダを作成し、
その中にコンテキストメニュー用のXMLファイルを作成します。
作成の流れはアプリバーへのボタンの追加、
オーバーフローメニューの追加の仕方とほぼ同じです。
こちらの記事を参考にしてください。


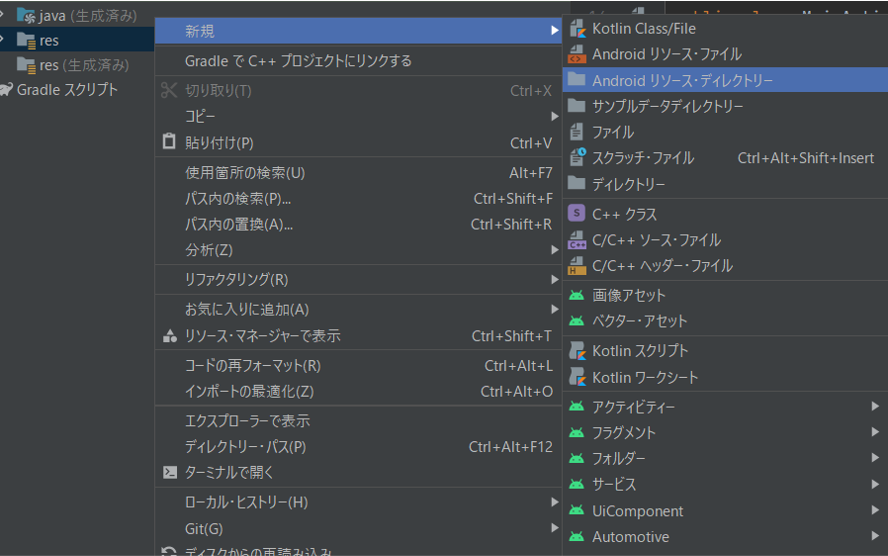
まずフォルダの作成です。
resフォルダの上で右クリック⇒新規⇒Android リソースディレクトリーを選択
リソースタイプをmenuに設定して、フォルダを作成
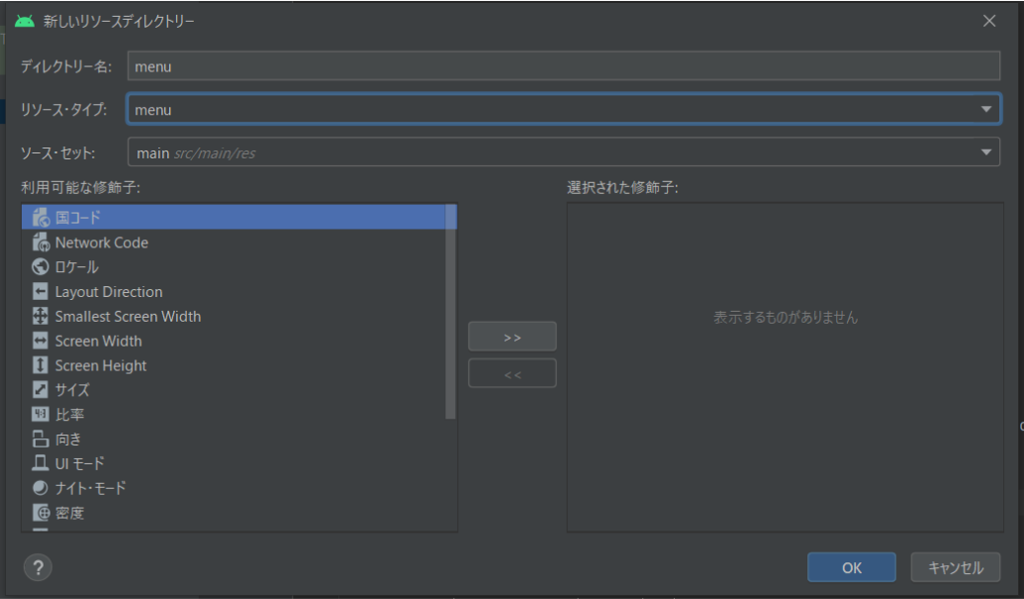
これで、メニュー用XMLファイルを入れるフォルダができました。
次にメニュー用XMLファイルの作成です。
menuフォルダの上で右クリック⇒新規⇒Menuリソースファイルを選択
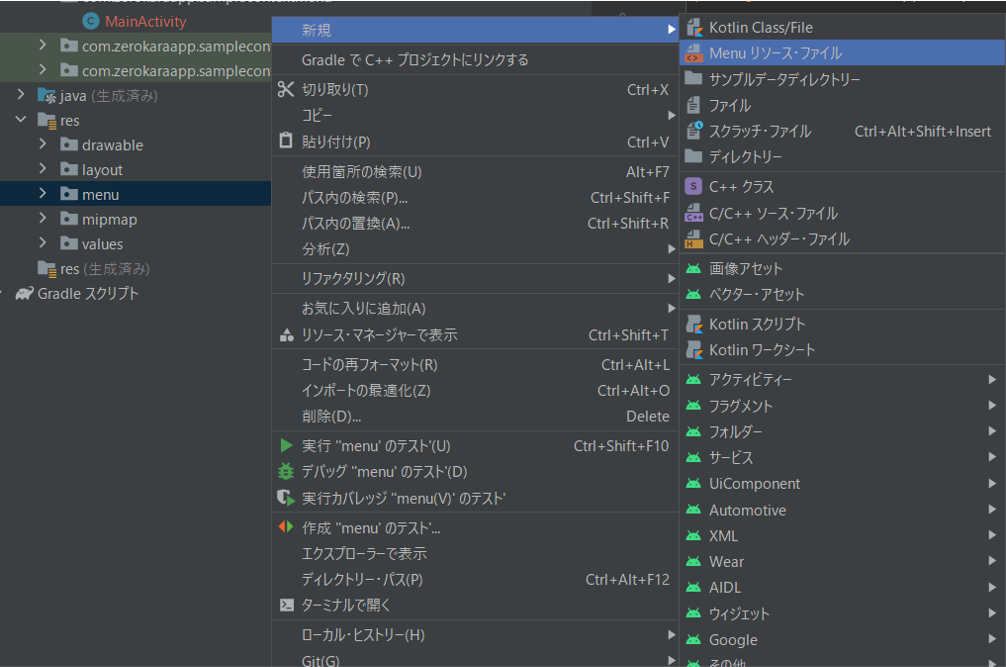
今回ファイルの名前を『context_menu.xml』としています。
このファイル名でメニュー用XMLファイルを作成してください。
メニュー用XMLファイルの中身は、以下のコードとなります。
以前の記事と異なるのは、『app:showAsAction』の属性が不要な点です。
<?xml version="1.0" encoding="utf-8"?>
<menu xmlns:android="http://schemas.android.com/apk/res/android">
    <item
        android:id="@+id/Menu_English"
        android:title="@string/english"/>
    <item
        android:id="@+id/Menu_Japanese"
        android:title="@string/japanese"/>
</menu>
(@stringの内容は後述のサンプルコードを参考にしてください。)
以上がコンテキストメニュー用のXMLファイルを作成となります。
長押ししたときコンテキストメニューを表示するよう定義
続いて、長押ししたときにコンテキストメニューが表示するよう定義します。
この定義は、onCreateContextMenuをオーバーライドし実装します。
このメソッドの中でメニューインフレーターを取得し、
メニューファイルをインフレートすることで、
長押ししたときにコンテキストメニューが表示されるようになります。
実装文は以下の通りです。
@Override
public void onCreateContextMenu(ContextMenu contextMenu, View view, ContextMenu.ContextMenuInfo contextMenuInfo){
    //オーバーライド元のメソッド呼び出し
    super.onCreateContextMenu(contextMenu,view,contextMenuInfo);

    //メニューのインフレーターオブジェクトを取得
    MenuInflater menuInflater = getMenuInflater();
    //コンテキストメニュー用のmenuXMLファイルをインフレート
    menuInflater.inflate(R.menu.context_menu,contextMenu);
    //コンテキストメニューのタイトルを設定
    contextMenu.setHeaderTitle(R.string.context_menu_title);
}
(@stringの内容は後述のサンプルコードを参考にしてください。)
最後のsetHeaderTitleはコンテキストメニューのタイトル欄の設定となります。
無くても構わないので、お好みで使用して下さい。
コンテキストメニューを実装するビューを指定
次にコンテキストメニューを実装するビューを指定します。
現状、何かを長押ししても、コンテキストメニューは表示されません。
理由はコンテキストメニューの実装を指定していないからです。
onCreateメソッドの中で以下の文を宣言することで、
コンテキストメニューを実装することができます。
//コンテキストメニューの実装
registerForContextMenu(listView);
listViewの部分は、自分がコンテキストメニューを実装したいViewオブジェクトを記載してください。
コンテキストメニューを押したときの動作を定義
最後に、コンテキストメニューを押したときの動作を定義します。
現状だとせっかく実装したコンテキストメニューも、押しても何も反応しない状態です。
コンテキストメニューの押したときの動作は、
onContextItemSelectedメソッドで定義できます。
今回のアプリでは、以下の2つの情報を取得する必要があります。
- Englishと日本語、どちらを押したか
- リストのどの項目を長押ししたか
1については、押されたメニューのIDを取得することで判別可能です。
2については、onContextItemSelectedメソッドの中で、
長押しされた項目の情報を取得する必要があります。
これらの実装文は以下の通りとなります。
@Override
public boolean onContextItemSelected(MenuItem item) {
    //長押しされた項目の情報をinfoに格納する
    AdapterView.AdapterContextMenuInfo info = (AdapterView.AdapterContextMenuInfo) item.getMenuInfo();

    //レイアウトからテキストビューの取得
    TextView textView =findViewById(R.id.textView);

    //1.English、日本語どちらを押されたかで条件分岐
    //2.長押しされた項目のpositionで条件分岐
    switch (item.getItemId()) {
        case R.id.Menu_English:
            switch(info.position){
                case 0:
                    textView.setText(R.string.mercury_title);
                    break;
                case 1:
                    textView.setText(R.string.venus_title);
                    break;
                case 2:
                    textView.setText(R.string.earth_title);
                    break;
                case 3:
                    textView.setText(R.string.mars_title);
                    break;
                case 4:
                    textView.setText(R.string.jupiter_title);
                    break;
                case 5:
                    textView.setText(R.string.saturn_title);
                    break;
                case 6:
                    textView.setText(R.string.uranus_title);
                    break;
                case 7:
                    textView.setText(R.string.neptune_title);
                    break;
            }
            return true;
        case R.id.Menu_Japanese:
            switch(info.position){
                case 0:
                    textView.setText(R.string.mercury);
                    break;
                case 1:
                    textView.setText(R.string.venus);
                    break;
                case 2:
                    textView.setText(R.string.earth);
                    break;
                case 3:
                    textView.setText(R.string.mars);
                    break;
                case 4:
                    textView.setText(R.string.jupiter);
                    break;
                case 5:
                    textView.setText(R.string.saturn);
                    break;
                case 6:
                    textView.setText(R.string.uranus);
                    break;
                case 7:
                    textView.setText(R.string.neptune);
                    break;
            }
            return true;
        default:
            //例外時の処理は、オーバーライド元のメソッド呼び出しで対応
            return super.onContextItemSelected(item);
    }
}
(@stringの内容は後述のサンプルコードを参考にしてください。)
4行目のコードにて、長押しされた項目の情報を取得しています。
また、この情報からpositionの情報を取り出し、条件分岐しています。
以上がコンテキストメニューを押されたときの動作の定義となります。
サンプルコード
今回のアプリのサンプルコードを記載します。
今回のアプリはGitHubに公開しています。
下記URLの『SampleContextMenu』です。
是非参考にしてください。
文字列リソースファイル string.xml
<resources>
    <string name="app_name">SampleContextMenu</string>
    <string name="text_view">コンテキストメニューを選択してください</string>
    <string-array name="planet_list">
        <item>Mercury</item>
        <item>Venus</item>
        <item>Earth</item>
        <item>Mars</item>
        <item>Jupiter</item>
        <item>Saturn</item>
        <item>Uranus</item>
        <item>Neptune</item>
    </string-array>
    <string name="mercury_title">Mercury</string>
    <string name="venus_title">Venus</string>
    <string name="earth_title">Earth</string>
    <string name="mars_title">Mars</string>
    <string name="jupiter_title">Jupiter</string>
    <string name="saturn_title">Saturn</string>
    <string name="uranus_title">Uranus</string>
    <string name="neptune_title">Neptune</string>
    <string name="context_menu_title">翻訳</string>
    <string name="english">English</string>
    <string name="japanese">日本語</string>
    <string name="mercury">水星</string>
    <string name="venus">金星</string>
    <string name="earth">地球</string>
    <string name="mars">火星</string>
    <string name="jupiter">木星</string>
    <string name="saturn">土星</string>
    <string name="uranus">天王星</string>
    <string name="neptune">海王星</string>
</resources>
レイアウトファイル activity_main.xml
<?xml version="1.0" encoding="utf-8"?>
<androidx.constraintlayout.widget.ConstraintLayout xmlns:android="http://schemas.android.com/apk/res/android"
    xmlns:app="http://schemas.android.com/apk/res-auto"
    xmlns:tools="http://schemas.android.com/tools"
    android:layout_width="match_parent"
    android:layout_height="match_parent"
    tools:context=".MainActivity">

    <TextView
        android:id="@+id/textView"
        android:layout_width="wrap_content"
        android:layout_height="wrap_content"
        android:text="@string/text_view"
        app:layout_constraintBottom_toBottomOf="parent"
        app:layout_constraintLeft_toLeftOf="parent"
        app:layout_constraintRight_toRightOf="parent"
        app:layout_constraintTop_toBottomOf="@+id/planet_list_view" />

    <ListView
        android:id="@+id/planet_list_view"
        android:layout_width="match_parent"
        android:layout_height="wrap_content"
        app:layout_constraintEnd_toEndOf="parent"
        app:layout_constraintStart_toStartOf="parent"
        app:layout_constraintTop_toTopOf="parent"
        android:entries="@array/planet_list"/>

</androidx.constraintlayout.widget.ConstraintLayout>
メニュー用XMLファイル context_menu.xml
<?xml version="1.0" encoding="utf-8"?>
<menu xmlns:android="http://schemas.android.com/apk/res/android">
    <item
        android:id="@+id/Menu_English"
        android:title="@string/english"/>
    <item
        android:id="@+id/Menu_Japanese"
        android:title="@string/japanese"/>
</menu>
アクティビティファイル MainActivity.java
package com.zerokaraapp.samplecontextmenu;

import androidx.appcompat.app.AppCompatActivity;

import android.os.Bundle;
import android.view.ContextMenu;
import android.view.MenuInflater;
import android.view.MenuItem;
import android.view.View;
import android.widget.AdapterView;
import android.widget.ListView;
import android.widget.TextView;

public class MainActivity extends AppCompatActivity {

    @Override
    protected void onCreate(Bundle savedInstanceState) {
        super.onCreate(savedInstanceState);
        setContentView(R.layout.activity_main);

        //リストビューの取得
        ListView listView = findViewById(R.id.planet_list_view);
        //コンテキストメニューの実装
        registerForContextMenu(listView);
    }

    @Override
    public void onCreateContextMenu(ContextMenu contextMenu, View view, ContextMenu.ContextMenuInfo contextMenuInfo){
        //オーバーライド元のメソッド呼び出し
        super.onCreateContextMenu(contextMenu,view,contextMenuInfo);

        //メニューのインフレーターオブジェクトを取得
        MenuInflater menuInflater = getMenuInflater();
        //コンテキストメニュー用のmenuXMLファイルをインフレート
        menuInflater.inflate(R.menu.context_menu,contextMenu);
        //コンテキストメニューのタイトルを設定
        contextMenu.setHeaderTitle(R.string.context_menu_title);
    }

    @Override
    public boolean onContextItemSelected(MenuItem item) {
        //長押しされた項目の情報をinfoに格納する
        AdapterView.AdapterContextMenuInfo info = (AdapterView.AdapterContextMenuInfo) item.getMenuInfo();

        //レイアウトからテキストビューの取得
        TextView textView =findViewById(R.id.textView);

        //1.English、日本語どちらを押されたかで条件分岐
        //2.長押しされた項目のpositionで条件分岐
        switch (item.getItemId()) {
            case R.id.Menu_English:
                switch(info.position){
                    case 0:
                        textView.setText(R.string.mercury_title);
                        break;
                    case 1:
                        textView.setText(R.string.venus_title);
                        break;
                    case 2:
                        textView.setText(R.string.earth_title);
                        break;
                    case 3:
                        textView.setText(R.string.mars_title);
                        break;
                    case 4:
                        textView.setText(R.string.jupiter_title);
                        break;
                    case 5:
                        textView.setText(R.string.saturn_title);
                        break;
                    case 6:
                        textView.setText(R.string.uranus_title);
                        break;
                    case 7:
                        textView.setText(R.string.neptune_title);
                        break;
                }
                return true;
            case R.id.Menu_Japanese:
                switch(info.position){
                    case 0:
                        textView.setText(R.string.mercury);
                        break;
                    case 1:
                        textView.setText(R.string.venus);
                        break;
                    case 2:
                        textView.setText(R.string.earth);
                        break;
                    case 3:
                        textView.setText(R.string.mars);
                        break;
                    case 4:
                        textView.setText(R.string.jupiter);
                        break;
                    case 5:
                        textView.setText(R.string.saturn);
                        break;
                    case 6:
                        textView.setText(R.string.uranus);
                        break;
                    case 7:
                        textView.setText(R.string.neptune);
                        break;
                }
                return true;
            default:
                //例外時の処理は、オーバーライド元のメソッド呼び出しで対応
                return super.onContextItemSelected(item);
        }
    }

}
※javaファイルについて、1行目packageの部分は人によって異なります。
コピペする場合は2行目以降をコピペしてください。
ここまで出来たら一度アプリを実行してみましょう。
一番上の動画のアプリのように動作すれば成功です。
まとめ

今回は長押しで表示されるコンテキストメニューの使い方を解説しました。
このメニューもレイアウトを圧迫せずに実装可能なため、
いろいろな応用案が作れると思います。
ぜひ活用してみてください。
本記事が初心者の方の参考になれば幸いです。
次回の記事はこちら


コメント