

※本記事は2021年7月2日に更新しました。
「2つの画面で共通の部分があるけど、同じ内容を2回書くの面倒くさい!」
そんなあなたに朗報です。
まずはこちらの動画をご覧ください。
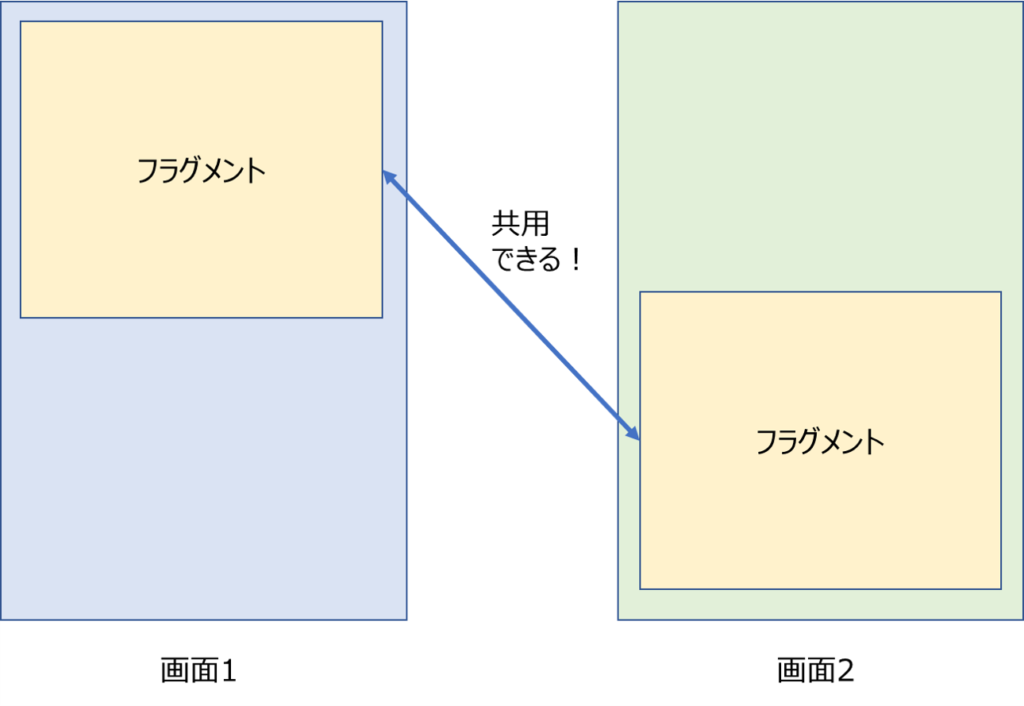
紫の部分が、画面1と画面2で共通していますよね。
なんとこの部分、コード上では1回しか記述していないんです。
この紫の部分のように、画面に埋め込まれた部品のことを、フラグメントと呼びます。
今回はこのフラグメントについて解説します。
前提として、本記事はAndroid Studio 4.2.1を対象に記載します。
また、筆者のAndroid Studioは日本語化しているため、日本語にて解説します。
本記事の使用言語はJavaとなります。
今回はProgate のJavaのレッスンがすべて理解できている、
という前提の上進めていきます。
では早速参りましょう!
前回の記事はこちら

フラグメントの使い方

まず最初にフラグメントとは何か?について解説します。
フラグメント (Fragment)は日本語に訳すと「断片」となります。
その名の通り、画面の1個の断片として使えるのがフラグメントです。
例えば今回のアプリのように2つの画面で同じフラグメントを持つことができます。
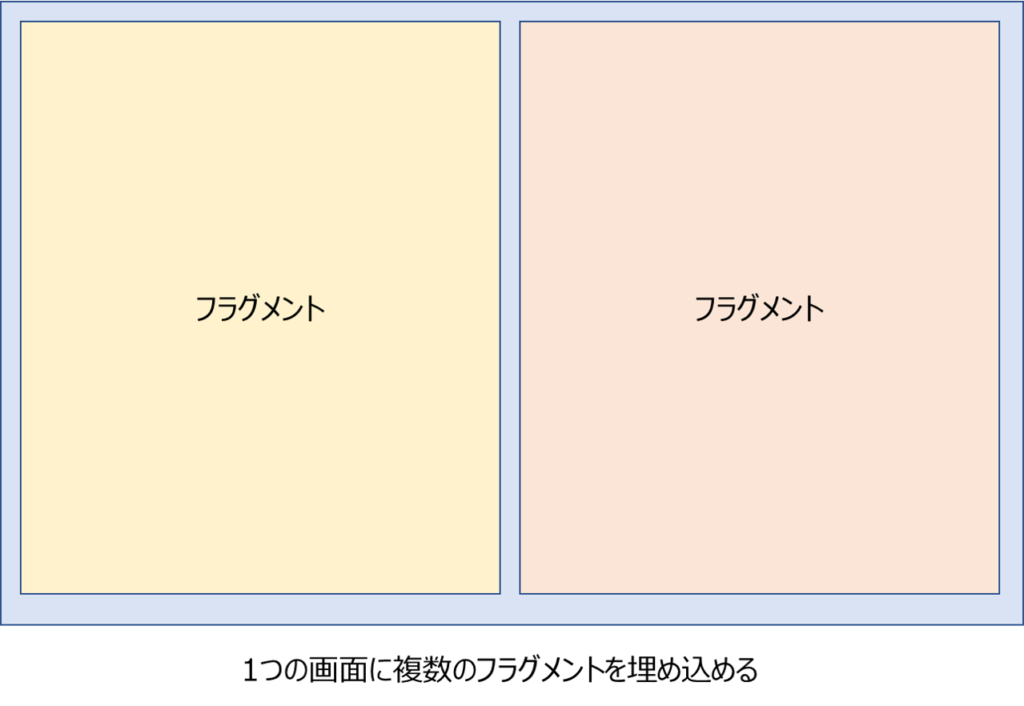
さらに、画面をフラグメントで分割して構成することができます。
今回は前者の使い方を解説します。
フラグメントの実装の仕方は以下の通りです。
- フラグメント用のレイアウトファイル、javaファイルを用意する
- 画面用のレイアウトファイルにフラグメントを埋め込む
※手順2をjavaファイルにコードで記載し埋め込む方法もあります。
今回この解説は省略します。
『え、これで終わり?』と思われるかもしれません。
フラグメントの埋め込み自体はとても簡単にできます。
今回の解説ではフラグメントの中身の編集等を省略しているため、
解説が短くなっています。
フラグメントの中身の編集自体はActivityのレイアウトファイルの編集と
同じように行えます。
こちらの記事を参考にしてください。

では、一つ一つ解説していきます。
フラグメント用のjavaファイル、レイアウトファイルを用意する
フラグメント用のレイアウトファイル、javaファイルを用意します。
左上のファイル⇒新規⇒フラグメント⇒フラグメント(空白)を選択してください。
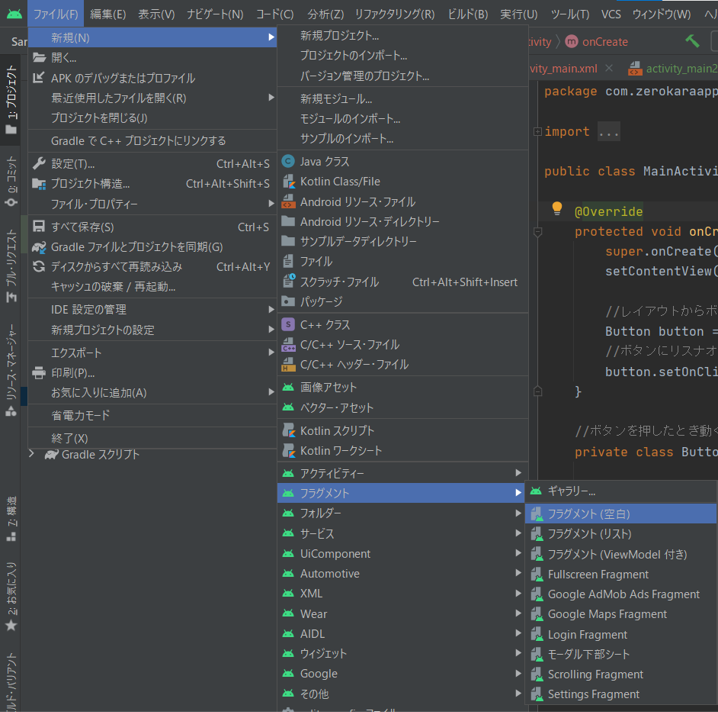
フラグメント名とフラグメントレイアウト名の設定画面になります。
今回はフラグメント名を『Fragment1』、レイアウト名を『fragment_1』としてください。
以上で、ファイルの用意は完了です。
画面用のレイアウトファイルにフラグメントを埋め込む
続いて、画面用のレイアウトファイルへのフラグメントを埋め込み方です。
以下のコードをレイアウトファイルに埋め込むことで、フラグメントが埋め込まれます。
<androidx.fragment.app.FragmentContainerView
    android:id="@+id/fragment_1"
    android:name="com.zerokaraapp.samplefragment.Fragment1"
    android:layout_width="0dp"
    android:layout_height="0dp"/>
※3行目”com.zerokaraapp.samplefragment.Fragment1″は人によって異なります。
『パッケージ名.フラグメント名』を記載してください。
(パッケージ名はjavaファイルの1行目に記載されています。)
※Constraintlayoutの場合はButton等と同様、位置の制約が必要となります。
必要に応じて付け加えてください。
これで、フラグメントの埋め込みは完了となります。
サンプルコード
最後に、サンプルコードを記載します。
今回のアプリはGitHubに公開しています。
下記URLの『SampleFragment』です。
是非参考にしてください。
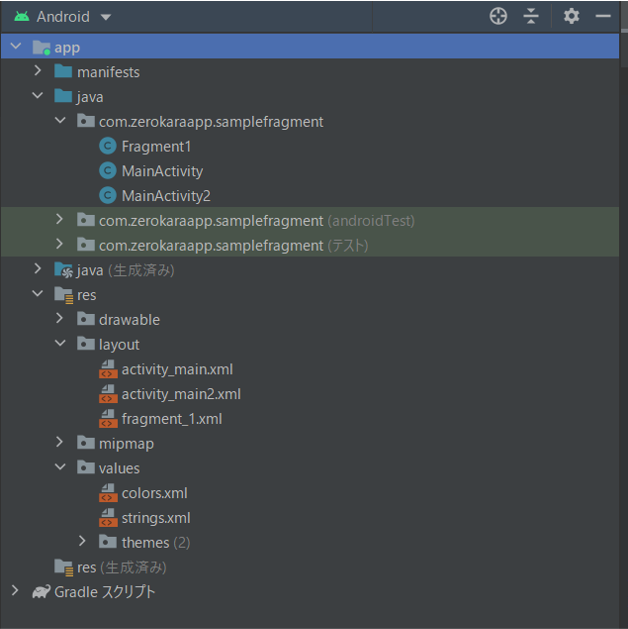
今回のアプリでは画面を2つ移動できるようにするため、
アクティビティファイルとレイアウトファイルを追加する必要があります。
ファイル構成は以下の通りです。
今回のアプリでは画面遷移を行います。
画面遷移のやり方については、次の記事をご一読ください。

文字列リソースファイル string.xml
<resources>
    <string name="app_name">SampleFragment</string>
    <string name="fragment">これはFragmentです</string>
    <string name="button_1">画面2へ移動</string>
    <string name="button_2">画面1へ移動</string>
</resources>
フラグメントレイアウトファイル fragment_1.xml
<?xml version="1.0" encoding="utf-8"?>
<FrameLayout xmlns:android="http://schemas.android.com/apk/res/android"
    xmlns:tools="http://schemas.android.com/tools"
    android:layout_width="match_parent"
    android:layout_height="match_parent"
    tools:context=".Fragment1"
    android:background="@color/purple_200">

    <TextView
        android:id="@+id/textView2"
        android:layout_width="wrap_content"
        android:layout_height="wrap_content"
        android:text="@string/fragment" />
</FrameLayout>
フラグメントファイル Fragment1.java
package com.zerokaraapp.samplefragment;

import android.os.Bundle;

import androidx.fragment.app.Fragment;

import android.view.LayoutInflater;
import android.view.View;
import android.view.ViewGroup;

public class Fragment1 extends Fragment {


    @Override
    public View onCreateView(LayoutInflater inflater, ViewGroup container,
                             Bundle savedInstanceState) {
        // Inflate the layout for this fragment
        return inflater.inflate(R.layout.fragment_1, container, false);
    }

}
※Fragment1.javaは作成時、既に様々なコードが記載された状態です。
今回のプログラムでは、onCreateViewメソッド以外は不要ですので、
サンプルコードのように削除してください。
画面1レイアウトファイル activity_main.xml
<?xml version="1.0" encoding="utf-8"?>
<androidx.constraintlayout.widget.ConstraintLayout xmlns:android="http://schemas.android.com/apk/res/android"
    xmlns:app="http://schemas.android.com/apk/res-auto"
    xmlns:tools="http://schemas.android.com/tools"
    android:layout_width="match_parent"
    android:layout_height="match_parent"
    tools:context=".MainActivity">

    <androidx.fragment.app.FragmentContainerView
        android:id="@+id/fragment_1"
        android:name="com.zerokaraapp.samplefragment.Fragment1"
        android:layout_width="0dp"
        android:layout_height="0dp"
        app:layout_constraintBottom_toBottomOf="parent"
        app:layout_constraintEnd_toEndOf="parent"
        app:layout_constraintStart_toStartOf="parent"
        app:layout_constraintTop_toBottomOf="@+id/button" />

    <Button
        android:id="@+id/button"
        android:layout_width="wrap_content"
        android:layout_height="wrap_content"
        android:text="@string/button_1"
        app:layout_constraintBottom_toBottomOf="parent"
        app:layout_constraintEnd_toEndOf="parent"
        app:layout_constraintStart_toStartOf="parent"
        app:layout_constraintTop_toTopOf="parent" />

</androidx.constraintlayout.widget.ConstraintLayout>
画面2レイアウトファイル activity_main2.xml
<?xml version="1.0" encoding="utf-8"?>
<androidx.constraintlayout.widget.ConstraintLayout xmlns:android="http://schemas.android.com/apk/res/android"
    xmlns:app="http://schemas.android.com/apk/res-auto"
    xmlns:tools="http://schemas.android.com/tools"
    android:layout_width="match_parent"
    android:layout_height="match_parent"
    tools:context=".MainActivity2">

    <androidx.fragment.app.FragmentContainerView
        android:id="@+id/fragment_1"
        android:name="com.zerokaraapp.samplefragment.Fragment1"
        android:layout_width="0dp"
        android:layout_height="0dp"
        app:layout_constraintBottom_toTopOf="@+id/button2"
        app:layout_constraintEnd_toEndOf="parent"
        app:layout_constraintStart_toStartOf="parent"
        app:layout_constraintTop_toTopOf="parent" />

    <Button
        android:id="@+id/button2"
        android:layout_width="wrap_content"
        android:layout_height="wrap_content"
        android:text="@string/button_2"
        app:layout_constraintBottom_toBottomOf="parent"
        app:layout_constraintEnd_toEndOf="parent"
        app:layout_constraintStart_toStartOf="parent"
        app:layout_constraintTop_toTopOf="parent" />
</androidx.constraintlayout.widget.ConstraintLayout>
※画面1、画面2共に”com.zerokaraapp.samplefragment.Fragment1″は、
人によって異なります。
『パッケージ名.フラグメント名』を記載してください。
(パッケージ名はjavaファイルの1行目に記載されています。)
画面1アクティビティファイル MainActivity.java
package com.zerokaraapp.samplefragment;

import androidx.appcompat.app.AppCompatActivity;

import android.content.Intent;
import android.os.Bundle;
import android.view.View;
import android.widget.Button;

public class MainActivity extends AppCompatActivity {

    @Override
    protected void onCreate(Bundle savedInstanceState) {
        super.onCreate(savedInstanceState);
        setContentView(R.layout.activity_main);

        //レイアウトからボタンを取得
        Button button = findViewById(R.id.button);
        //ボタンにリスナオブジェクトを設定
        button.setOnClickListener(new ButtonClickListener());
    }

    //ボタンを押したとき動くリスナクラスを定義
    private class ButtonClickListener implements View

            .OnClickListener{
        @Override
        public void onClick(View view){
            //画面2移動用のIntentを取得
            Intent intent = new Intent(MainActivity.this,MainActivity2.class);
            //画面2へ移動
            startActivity(intent);
        }
    }
}
画面2アクティビティファイル MainActivity2.java
package com.zerokaraapp.samplefragment;

import androidx.appcompat.app.AppCompatActivity;

import android.os.Bundle;
import android.view.View;
import android.widget.Button;

public class MainActivity2 extends AppCompatActivity {

    @Override
    protected void onCreate(Bundle savedInstanceState) {
        super.onCreate(savedInstanceState);
        setContentView(R.layout.activity_main2);

        //レイアウトからボタンを取得
        Button button = findViewById(R.id.button2);
        //ボタンにリスナオブジェクトを設定
        button.setOnClickListener(new ButtonClickListener2());
    }

    //ボタンを押したとき動くリスナクラスを定義
    private class ButtonClickListener2 implements View

            .OnClickListener{
        @Override
        public void onClick(View view){
            //画面を終了、画面1へ移動
            finish();
        }
    }
}
※javaファイルについて、1行目packageの部分は人によって異なります。
コピペする場合は2行目以降をコピペしてください。
ここまで出来たら一度アプリを実行してみましょう。
一番上の動画のアプリのように動作すれば成功です。
まとめ

本記事では画面1と画面2の共通の部品として、フラグメントを解説しました。
画面が複数になると同じコードを何度も書くのは面倒ですし、
誤記などエラーの元となります。
この問題はフラグメントを利用すれば解消できるので、ぜひ使ってみてください。
今回の方法だとレイアウトファイルに埋め込む形なので、
実装は簡単ですがフラグメントを閉じたり開いたりなど、
動的に作用させるのは難しいです。
次回の記事では、javaファイル内のコードにてフラグメントを実装する方法を解説します。
本記事が初心者の方の参考になれば幸いです。
次回の記事はこちら


コメント