

※本記事は2021年7月2日に更新しました。
「リストって、1行しかできないのかな…?」
「もっといろんな情報を表示できるようにしたい!」
色々とカスタマイズできますよ!
今回はリストの中身をカスタマイズする方法について解説します。
次の画像をご覧ください。
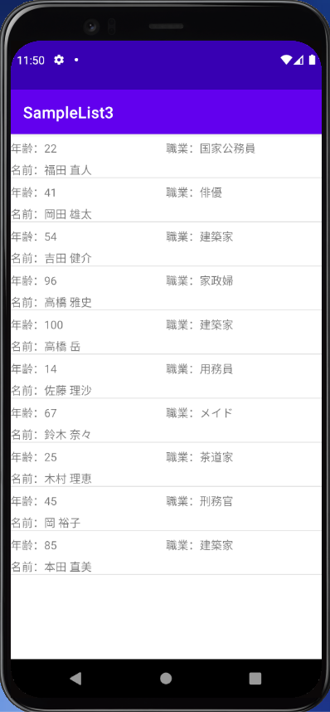
年齢、職業、名前が一塊になってリストで並んでいます。
このように、リストの中身を好きにカスタマイズする方法について解説します。
前提として、本記事はAndroid Studio 4.2.1を対象に記載します。
また、筆者のAndroid Studioは日本語化しているため、日本語にて解説します。
本記事の使用言語はJavaとなります。
今回はProgate のJavaのレッスンがすべて理解できている、
という前提の上進めていきます。
では早速参りましょう!
前回の記事はこちら

リストの中身をカスタマイズする方法

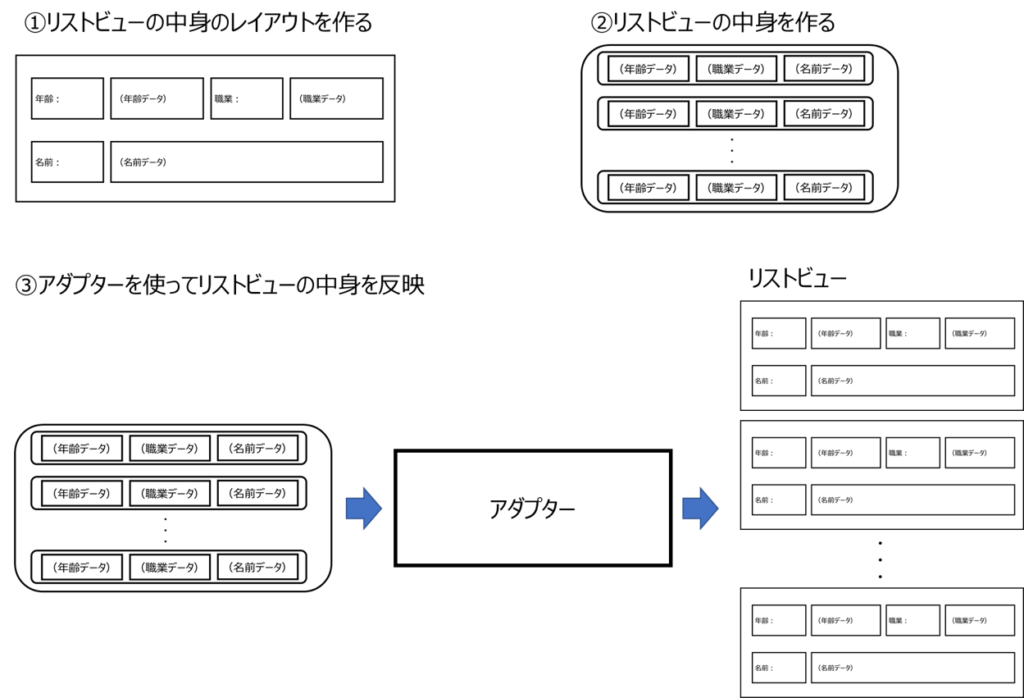
リストの中身をカスタマイズする方法ですが、
以下のように行います。
- リストの中身を作るレイアウトファイルを用意
- リストビューの中身を作るメソッドを作成
- アダプターを使ってリストビューの中身をリストに反映
図で表すと以下のようになります。
1つ1つ解説していきます。
リストの中身を作るレイアウトファイルを用意
リストのカスタマイズには、リストの中身を作るレイアウトファイルが必要です。
これは、リストの中身を一つのレイアウトと考えているからです。
今回のサンプルでは、以下のようなレイアウトを作成しています。
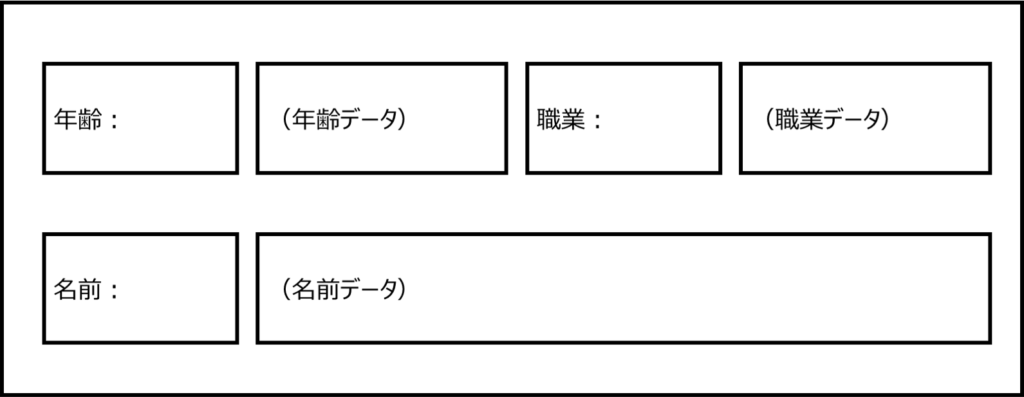
すべてテキストビューで作成しています。
( )の部分は今は空白です。
javaファイルでリストを作成する際に、文字を入れていきます。
サンプルコードは後半で提示します。
リストビューの中身を作るメソッドを作成
リストビューの中身を作るメソッドを、MainActivityに作成します。
まず、リストデータ全体を表すインスタンスを、以下のように用意します。
List<Map<String,Object>> profileList = new ArrayList<>();
次に、リストの中身一つ一つを格納するインスタンスを用意します。
リストの中身はMapインスタンスを利用して作成します。
Map<String,Object> profile = new HashMap<>();
インスタンスを用意できたら、データの代入です。
データの代入は、以下のように行います。
profile.put("age",22);
profile.put("work","国家公務員");
profile.put("name","福田 直人");
profileList.add(profile);
キーと値をセットでMapインスタンスに代入します。
値を代入が終わったら、リストインスタンスに追加します。
この作業を繰り返してデータを作成します。
繰り返し例:
profile = new HashMap<>();
profile.put("age",41);
profile.put("work","俳優");
profile.put("name","岡田 雄太");
profileList.add(profile);
最終的に、リストインスタンスを返すようにしてメソッドは完成です。
アダプターを使ってリストビューの中身をリストに反映
リストをリストビューに反映するには、アダプターを使います。
今回はSimpleAdapterを使用します。
//レイアウトからリストビューを取得
ListView profile = findViewById(R.id.list_View);
//createメソッドを使ってリストを生成
List<Map<String,Object>> profileList = createProfileList();

//SimpleAdapterを生成、これでリストの構成を指示する
SimpleAdapter adapter = new SimpleAdapter(MainActivity.this,profileList,R.layout.content,FROM,TO);

//adapterをつかってリストビューにデータを登録
profile.setAdapter(adapter);
createProfileListは上で作成したListを生成するメソッドです。
SimpleAdapterの引数2つ目はリストのインスタンス、
3つ目のR.layout.contentは上で定義したリストの中身のレイアウトのIDです。
引数4つ目のFROMと5つ目のTOはフィールドとして以下のように定義しています。
//SimpleAdapter の引数に使用する、データ格納のキーのリスト
private static final String[] FROM = {"age","work","name"};
//SimpleAdapter の引数に使用する、データ出力先のIDのリスト
private static final int[] TO = {R.id.age,R.id.work,R.id.name};
SimpleAdapterで、FROMとTOを順番に結び付けます。
図で表すと、以下のようになります。
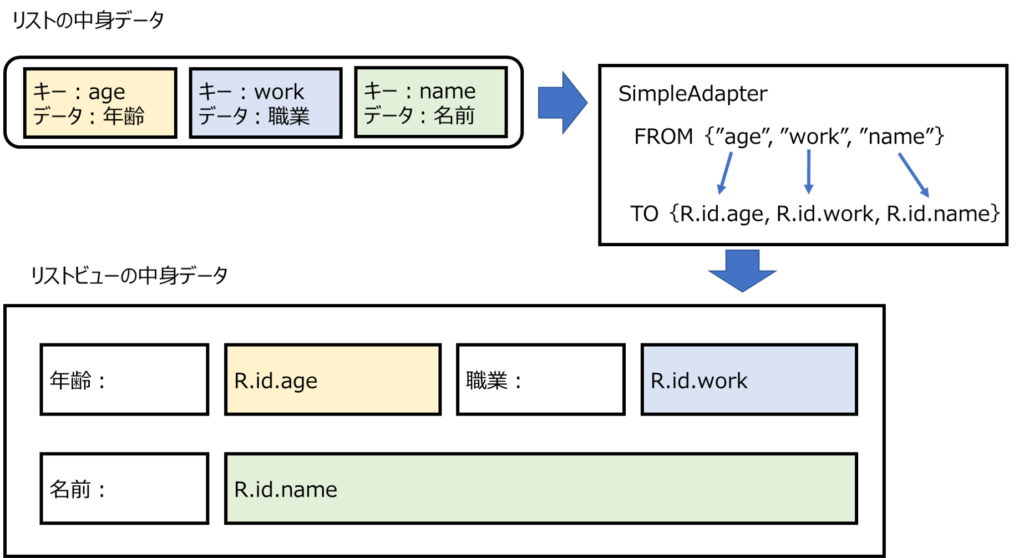
SimpleAdapterはこの登録作業をリスト内の登録されたデータすべてに対して行います。
最後に、以下のコードでリストビューにデータを登録します。
profile.setAdapter(adapter);
以上が、リストビューの中身をカスタマイズする方法です。
サンプルコード
最後に、サンプルコードを記載します。
今回のアプリはGitHubに公開しています。
下記URLの『SampleList3』です。
是非参考にしてください。
文字列リソースファイル、string.xml
<resources>
    <string name="app_name">SampleList3</string>
    <string name="age">年齢:</string>
    <string name="work">職業:</string>
    <string name="name">名前:</string>
</resources>
レイアウトファイル(activity_main.xml)
<?xml version="1.0" encoding="utf-8"?>
<androidx.constraintlayout.widget.ConstraintLayout xmlns:android="http://schemas.android.com/apk/res/android"
    xmlns:app="http://schemas.android.com/apk/res-auto"
    xmlns:tools="http://schemas.android.com/tools"
    android:layout_width="match_parent"
    android:layout_height="match_parent"
    tools:context=".MainActivity">

    <ListView
        android:id="@+id/list_View"
        android:layout_width="0dp"
        android:layout_height="0dp"
        app:layout_constraintBottom_toBottomOf="parent"
        app:layout_constraintEnd_toEndOf="parent"
        app:layout_constraintStart_toStartOf="parent"
        app:layout_constraintTop_toTopOf="parent" />
</androidx.constraintlayout.widget.ConstraintLayout>
リストビューの中身作成用レイアウトファイル content.xml
<?xml version="1.0" encoding="utf-8"?>
<LinearLayout xmlns:android="http://schemas.android.com/apk/res/android"
    android:orientation="vertical"
    android:layout_width="match_parent"
    android:layout_height="match_parent">

    <LinearLayout
        android:layout_width="match_parent"
        android:layout_height="wrap_content"
        android:orientation="horizontal"
        android:layout_marginTop="8dp">

        <TextView
            android:id="@+id/explain_age"
            android:layout_width="wrap_content"
            android:layout_height="wrap_content"
            android:text="@string/age" />

        <TextView
            android:id="@+id/age"
            android:layout_width="match_parent"
            android:layout_height="wrap_content"
            android:layout_weight="1"/>

        <TextView
            android:id="@+id/explain_work"
            android:layout_width="wrap_content"
            android:layout_height="wrap_content"
            android:text="@string/work" />

        <TextView
            android:id="@+id/work"
            android:layout_width="match_parent"
            android:layout_height="wrap_content"
            android:layout_weight="1"/>
    </LinearLayout>

    <LinearLayout
        android:layout_width="match_parent"
        android:layout_height="wrap_content"
        android:orientation="horizontal"
        android:layout_marginTop="8dp">

        <TextView
            android:id="@+id/explain_name"
            android:layout_width="wrap_content"
            android:layout_height="wrap_content"
            android:text="@string/name" />

        <TextView
            android:id="@+id/name"
            android:layout_width="wrap_content"
            android:layout_height="match_parent"/>
    </LinearLayout>
</LinearLayout>
アクティビティファイル MainActivity.java
package com.zerokaraapp.samplelist3;

import androidx.appcompat.app.AppCompatActivity;

import android.os.Bundle;
import android.widget.ListView;
import android.widget.SimpleAdapter;

import java.util.ArrayList;
import java.util.HashMap;
import java.util.List;
import java.util.Map;

public class MainActivity extends AppCompatActivity {

    //SimpleAdapter の引数に使用する、データ格納のキーのリスト
    private static final String[] FROM = {"age","work","name"};
    //SimpleAdapter の引数に使用する、データ出力先のIDのリスト
    private static final int[] TO = {R.id.age,R.id.work,R.id.name};

    @Override
    protected void onCreate(Bundle savedInstanceState) {
        super.onCreate(savedInstanceState);
        setContentView(R.layout.activity_main);

        //レイアウトからリストビューを取得
        ListView profile = findViewById(R.id.list_View);
        //createメソッドを使ってリストを生成
        List<Map<String,Object>> profileList = createProfileList();

        //SimpleAdapterを生成、これでリストの構成を指示する
        SimpleAdapter adapter = new SimpleAdapter(MainActivity.this,profileList,R.layout.content,FROM,TO);

        //adapterをつかってリストビューにデータを登録
        profile.setAdapter(adapter);
    }

    //リストビューの中に入れるものを生成するメソッド
    private List<Map<String,Object>> createProfileList(){
        //リストインスタンス生成。ここにリストを入れていく
        List<Map<String,Object>> profileList = new ArrayList<>();
        //データを格納するMapインスタンスの用意
        Map<String,Object> profile = new HashMap<>();

        //データの格納開始
        profile.put("age",22);
        profile.put("work","国家公務員");
        profile.put("name","福田 直人");
        profileList.add(profile);
        //下の5行を好きなだけ繰り返してください。
        profile = new HashMap<>();
        profile.put("age",41);
        profile.put("work","俳優");
        profile.put("name","岡田 雄太");
        profileList.add(profile);

        profile = new HashMap<>();
        profile.put("age",54);
        profile.put("work","建築家");
        profile.put("name","吉田 健介");
        profileList.add(profile);

        profile = new HashMap<>();
        profile.put("age",96);
        profile.put("work","家政婦");
        profile.put("name","高橋 雅史");
        profileList.add(profile);

        profile = new HashMap<>();
        profile.put("age",100);
        profile.put("work","建築家");
        profile.put("name","高橋 岳");
        profileList.add(profile);

        profile = new HashMap<>();
        profile.put("age",14);
        profile.put("work","用務員");
        profile.put("name","佐藤 理沙");
        profileList.add(profile);

        profile = new HashMap<>();
        profile.put("age",67);
        profile.put("work","メイド");
        profile.put("name","鈴木 奈々");
        profileList.add(profile);

        profile = new HashMap<>();
        profile.put("age",25);
        profile.put("work","茶道家");
        profile.put("name","木村 理恵");
        profileList.add(profile);

        profile = new HashMap<>();
        profile.put("age",45);
        profile.put("work","刑務官");
        profile.put("name","岡 裕子");
        profileList.add(profile);

        profile = new HashMap<>();
        profile.put("age",85);
        profile.put("work","建築家");
        profile.put("name","本田 直美");
        profileList.add(profile);

        //格納したprofileListをリターン
        return profileList;
    }

}
※javaファイルについて、1行目packageの部分は人によって異なります。
コピペする場合は2行目以降をコピペしてください。
ここまで出来たら一度アプリを実行してみましょう。
一番上の画像の画面が出てきたら成功です。
まとめ

今回はリストの中身をカスタマイズする方法について解説しました。
これを使えばいろいろなビューが作成でき、
アプリ作成の幅が広がると思います。
是非マスターしてみてください。
本記事が初心者の方の参考になれば幸いです。
次回の記事はこちら


コメント