※本記事は2021年7月2日に更新しました。
『画面移動の時にデータの受け渡しをしたいけど、どうすればいいの?』
本記事ではそんな要望にお応えします。
まずは、こちらの動画をご覧ください。
画面1で入力した文字を画面2で表示させる、というアプリです。
画面1と画面2で入力した文字を受け渡しています。
今回はメイン画面からサブ画面へ情報を受け渡す方法について解説します。
本記事が初心者の方の参考になれば幸いです。
前提として、本記事はAndroid Studio 4.2.1を対象に記載します。
また、筆者のAndroid Studioは日本語化しているため、日本語にて解説します。
本記事の使用言語はJavaとなります。
今回はProgate のJavaのレッスンがすべて理解できている、
という前提の上進めていきます。
では早速参りましょう!
前回記事はこちら
メイン画面からサブ画面へ情報を受け渡す方法

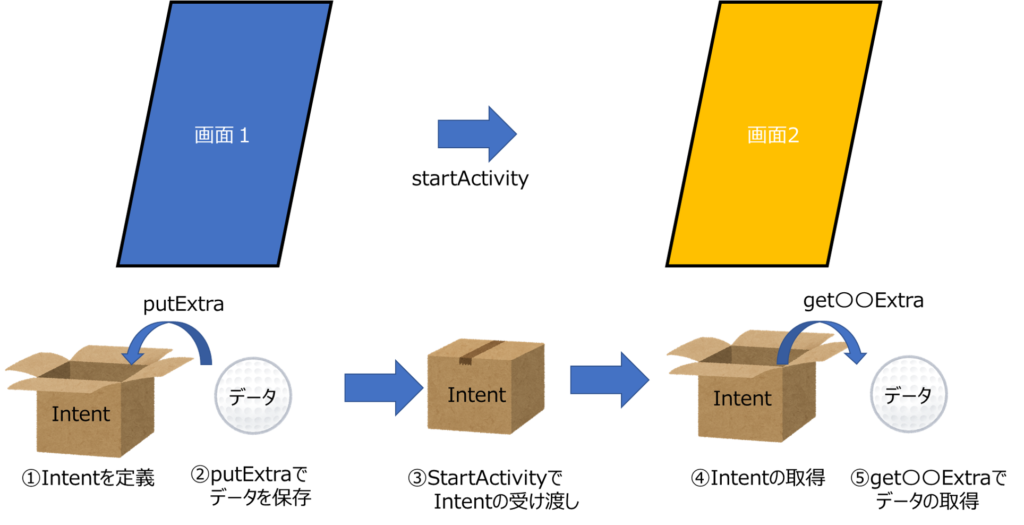
メイン画面の画面1からサブ画面の画面2に情報を受け渡すには、『Intent』オブジェクトを使います。
『Intent』オブジェクトは画面間の移動の際にメッセンジャー的な役割を果たします。
データを入れる箱のイメージです。
情報の受け渡しの手順は、以下の通りです。
- (画面1)Intentを定義
- (画面1)putExtra()でデータを保存
- (画面1)StartActivityでIntentの受け渡し
- (画面2)Intentの取得
- (画面2)get〇〇Extraでデータの取得
5の〇〇の部分には変数の型(String,int等)が入ります。
図で表すと以下の通りです。

一つ一つ解説していきます。
Intentを定義
画面1にてIntentのインスタンスを定義します。
定義の文は以下の通りです。
Intent intent1 = new Intent(MainActivity.this,MainActivity2.class);
これで画面1、MainActivityから、画面2、MainActivity2へのメッセージであることを明示します。
putExtra()でデータを保存
次にデータの保存の仕方です。
IntentのメソッドであるputExtraは以下のように引数を取ります。
putExtra("キー",保存したいデータ)
ここでキーとは荷札のようなものだと考えてください。
データを取り出す際、荷札を使ってどのデータか判別し、データを取り出します。
startActivityでIntentの受け渡し
startActivityは画面2の起動に使うメソッドです。
Intentのインスタンスを引数に持つため、画面2にIntentの情報を引き渡すことができます。
コードは以下の通りです。(intentというインスタンスを受け渡すとします。)
startActivity(intent);
Intentの取得
画面2でのIntentの取得方法です。
以下のようにgetIntetメソッドを使ってIntentを取得します。
Intent intent2 = getIntent();
get〇〇Extraでデータの取得
最後に、受け取ったIntentインスタンスから画面1で保存したデータを取得します。
データの取得にはIntentのメソッドであるget〇〇Extraメソッドを使います。
〇〇の部分にはデータ型を、引数にはデータの保存の際に使用したキーを代入します。
例えばString型でキーが”input”ならば、
getStringExtra("input")
となります。
以上がデータの受け渡し方法となります。
画面間でデータを受け渡すアプリを作ってみよう

本記事で一番最初に紹介したアプリを作成しましょう。
作成の流れは以下の通りです。
- アクティビティファイルを追加する
- 文字列リソースファイルを作成する
- レイアウトファイルを2つ作成する
- アクティビティファイルを2つ作成する
今回のアプリはGitHubに公開しています。
下記URLの『SampleActivity2』です。
是非参考にしてください。
それでは作成していきます!
アクティビティファイルを追加する
まずAndroid Studioで新たなアクティビティーを準備します。
Android Studio 画面左上のファイル ⇒ 新規 ⇒ アクティビティー
⇒ 空のアクティビティー
と選択し、アクティビティーの名前を入力すると作成されます。
(今回は名前をMainActivity2としています。)
文字列リソースファイルを作成する
次に、文字列リソースファイル string.xmlの作成です。
以下のコードをコピペしてください。
<resources>
    <string name="app_name">SampleActivity2</string>
    <string name="ev_text">文字を入力してください</string>
    <string name="bt_text_1">画面2へ移動</string>
    <string name="bt_text_2">画面1へ移動</string>
</resources>
レイアウトファイルを2つ作成する
画面1、画面2のレイアウトファイルを作成していきます。
画面1、activity_main.xmlのコードは次の通りです。
<?xml version="1.0" encoding="utf-8"?>
<androidx.constraintlayout.widget.ConstraintLayout xmlns:android="http://schemas.android.com/apk/res/android"
    xmlns:app="http://schemas.android.com/apk/res-auto"
    xmlns:tools="http://schemas.android.com/tools"
    android:layout_width="match_parent"
    android:layout_height="match_parent"
    tools:context=".MainActivity">

    <EditText
        android:id="@+id/et"
        android:layout_width="0dp"
        android:layout_height="wrap_content"
        android:ems="10"
        android:hint="@string/ev_text"
        android:inputType="text"
        app:layout_constraintBottom_toBottomOf="parent"
        app:layout_constraintEnd_toEndOf="parent"
        app:layout_constraintStart_toStartOf="parent"
        app:layout_constraintTop_toTopOf="parent" />

    <Button
        android:id="@+id/bt1"
        android:layout_width="wrap_content"
        android:layout_height="wrap_content"
        android:text="@string/bt_text_1"
        app:layout_constraintBottom_toBottomOf="parent"
        app:layout_constraintEnd_toEndOf="parent"
        app:layout_constraintStart_toStartOf="parent"
        app:layout_constraintTop_toBottomOf="@+id/et" />
</androidx.constraintlayout.widget.ConstraintLayout>
続いて、画面2、activity_main2.xmlのコードは以下の通りです。
<?xml version="1.0" encoding="utf-8"?>
<androidx.constraintlayout.widget.ConstraintLayout xmlns:android="http://schemas.android.com/apk/res/android"
    xmlns:app="http://schemas.android.com/apk/res-auto"
    xmlns:tools="http://schemas.android.com/tools"
    android:layout_width="match_parent"
    android:layout_height="match_parent"
    tools:context=".MainActivity2">

    <TextView
        android:id="@+id/tv"
        android:layout_width="wrap_content"
        android:layout_height="wrap_content"
        android:text="TextView"
        app:layout_constraintBottom_toBottomOf="parent"
        app:layout_constraintEnd_toEndOf="parent"
        app:layout_constraintStart_toStartOf="parent"
        app:layout_constraintTop_toTopOf="parent" />

    <Button
        android:id="@+id/bt2"
        android:layout_width="wrap_content"
        android:layout_height="wrap_content"
        android:text="@string/bt_text_2"
        app:layout_constraintBottom_toBottomOf="parent"
        app:layout_constraintEnd_toEndOf="parent"
        app:layout_constraintStart_toStartOf="parent"
        app:layout_constraintTop_toBottomOf="@+id/tv" />
</androidx.constraintlayout.widget.ConstraintLayout>
以上でレイアウトファイルの作成は完了です。
ここまで出来たら一度アプリを実行してみましょう。
テキスト入力欄と、ボタンが表示されるはずです。
ただ、ここまでではボタンを押しても何も動作しません。
次からボタンの動きを設定していきましょう。
アクティビティファイルを2つ作成する
アクティビティファイルの作成をしていきましょう。
まず画面1、MainActivity.javaのコードは以下の通りです。
package com.zerokaraapp.sampleactivity2;

import androidx.appcompat.app.AppCompatActivity;

import android.content.Intent;
import android.os.Bundle;
import android.view.View;
import android.widget.Button;
import android.widget.EditText;

public class MainActivity extends AppCompatActivity {

    @Override
    protected void onCreate(Bundle savedInstanceState) {
        super.onCreate(savedInstanceState);
        setContentView(R.layout.activity_main);

        //レイアウトからボタンを取得
        Button button1 = findViewById(R.id.bt1);

        //ボタンクリックのリスナインスタンスを取得
        ButtonClickListener1 listener1 = new ButtonClickListener1();

        //ボタンにリスナを設定
        button1.setOnClickListener(listener1);
    }

    //ボタンクリック時のリスナクラスを設定
    private class ButtonClickListener1 implements View.OnClickListener{

        //クリックされたときの動作を定義するメソッドを定義
        @Override
        public void onClick(View view){

            //画面移動のためのインテントを取得
            Intent intent1 = new Intent(MainActivity.this,MainActivity2.class);

            //レイアウトからEditTextのビューを取得
            EditText editText = findViewById(R.id.et);

            //EditTextのビューのテキストを取得
            String text = editText.getText().toString();

            //インテントにtextを保存する
            intent1.putExtra("input",text);

            //画面移動を指示
            startActivity(intent1);
        }
    }
}
※1行目packageの部分は人によって異なります。
コピペする場合は2行目以降をコピペしてください。
画面2のコードも同様です
前半で解説したコードがボタンクリック時の動作に記載されていることが分かるかと思います。
続いて、画面2、MainActivity2.javaのコードを記載します。
コードは以下の通りです。
package com.zerokaraapp.sampleactivity2;

import androidx.appcompat.app.AppCompatActivity;

import android.content.Intent;
import android.os.Bundle;
import android.view.View;
import android.widget.Button;
import android.widget.TextView;

public class MainActivity2 extends AppCompatActivity {

    @Override
    protected void onCreate(Bundle savedInstanceState) {
        super.onCreate(savedInstanceState);
        setContentView(R.layout.activity_main2);

        //画面1からインテントを取得
        Intent intent2 = getIntent();

        //インテントからテキストを取得
        String text2 = intent2.getStringExtra("input");

        //レイアウトからテキストビューを取得
        TextView textView = findViewById(R.id.tv);

        //テキストビューにテキストを設定
        textView.setText(text2);


        //レイアウトからボタンを取得
        Button button2 = findViewById(R.id.bt2);

        //ボタンクリックのリスナインスタンスを取得
        ButtonClickListener2 listener2 = new ButtonClickListener2();

        //ボタンにリスナを設定
        button2.setOnClickListener(listener2);
    }

    //ボタンクリック時のリスナクラスを設定
    private class ButtonClickListener2 implements View.OnClickListener{

        //クリックされたときの動作を定義するメソッドを定義
        @Override
        public void onClick(View view){
            //画面移動
            finish();
        }
    }
}
こちらの場合、画面作成時の動作のため、onCreateに前半で解説したコードが記載されています。
以上のコードが作成出来たらアプリを実行してみましょう。
本記事1番上の動画のように動作すれば成功です。
まとめ

今回はメイン画面からサブ画面への画面移動時にデータを保存しておく方法について
解説していきました。
次回はサブ画面からメイン画面へのデータ移動について解説します。
本記事が初心者の方の参考になれば幸いです。
次回の記事はこちら


コメント